Title here
Summary here


Minimum configuration requirements
| Dependency | Value |
|---|---|
| Operating system | Linux, Windows, MacOS |
| Instruction architecture | x86_64, arm64 |
| Software dependency | Docker version 20.10.14 or above |
| Software dependency | Docker Compose version 2.0.0 or above |
| Minimum environment | 1 core CPU / 1 GB memory / 5 GB disk |
| IP address | Static IP |
| Domain Name | Recommended |
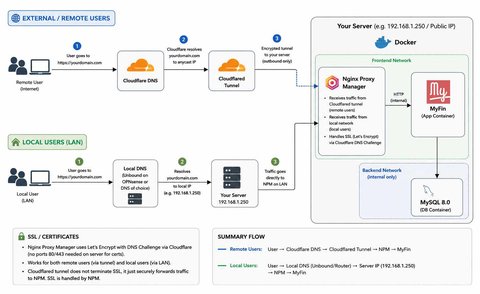
This will be the outcome of the guide.
Please note that there are many ways in which you can design and set up your network.
This is just a good starting point that is fairly quick and robust, however, depending on your IT infrastructure and hardware.
You will need to do further research to see what wil be the best for you.
Remember you can alway goto MyFin Support for help.
services:
  myfin:
    image: myfin/subscription:latest
    container_name: myfin
    restart: always
    expose:
      - "${INTERNAL_PORT}"
    depends_on:
      db:
        condition: service_healthy
    env_file:
      - .env
    networks:
      - frontend
      - backend
  db:
    container_name: myfin_db
    image: mysql:latest
    restart: always
    environment:
      MYSQL_DATABASE: ${DATABASE_NAME}
      MYSQL_USER: ${DATABASE_USER}
      MYSQL_PASSWORD: ${DATABASE_PASSWORD}
      MYSQL_ROOT_PASSWORD: ${DATABASE_ROOT_PASSWORD}
      MYSQL_ROOT_HOST: "%"
    volumes:
      - ./db_data:/var/lib/mysql
    networks:
      - backend
    healthcheck:
      test:
        [
          "CMD",
          "mysqladmin",
          "ping",
          "-h",
          "localhost",
          "-u",
          "root",
          "-p${DATABASE_ROOT_PASSWORD}",
        ]
      interval: 5s
      timeout: 5s
      retries: 20
      start_period: 30s
  npm:
    image: jc21/nginx-proxy-manager:latest
    container_name: nginx_proxy_manager
    restart: always
    ports:
      - "80:80"
      - "81:81"
      - "443:443"
    volumes:
      - ./npm/data:/data
      - ./npm/letsencrypt:/etc/letsencrypt
    depends_on:
      - myfin
    networks:
      - frontend
  cloudflared:
    image: cloudflare/cloudflared:latest
    container_name: cloudflared
    restart: always
    command: tunnel run
    environment:
      - TUNNEL_TOKEN=${CLOUDFLARE_TUNNEL_TOKEN}
    depends_on:
      - npm
    networks:
      - frontend

networks:
  frontend:
    driver: bridge

  backend:
    driver: bridge
    internal: true
Here is the env file
# The internal and external ports to use
INTERNAL_PORT=3000
# Public port can be 80 if you are not using other software or a reverse proxy that uses port 80
PUB_PORT=3000

# name of domain you access MyFin from, eg http://localhost:3000, https://myfin-pc.local, http://192.168.0.250 etc
DOMAIN_URL=<Your domain or IP address>
# Set to 0 if you are using a trusted certificate for SSL (https), set to 1 if using self signed
ALLOW_SELF_SIGNED_CERTS=1

# db host will be the name of the postgres container in the compose file
DATABASE_HOST=db
DATABASE_PORT=3306
DATABASE_USER=myfin_user
DATABASE_PASSWORD=<a long user password>
DATABASE_NAME=myfin
DATABASE_ROOT_PASSWORD=<a long root user password>

# Used to encrypt your SMTP password
SMTP_ENCRYPTION_KEY=<A 64 char random sting of numbers and chars>
# To enable or disable email sending
EMAIL_SEND_MAIL=<true or false>
# SMTP for User invites, password resets etc etc
EMAIL_SENDER_HOST=
EMAIL_SENDER_PORT=
EMAIL_SENDER_USER=
EMAIL_SENDER_PASS=

# Passkey url, You instance domain name without http / https, eg your-server.com, localhost, 192.168.0.250
AUTH_RRP_ID=
# Log in session length
AUTH_SESSION_HOURS=9

# Your cloudflare tunnel token
CLOUDFLARE_TUNNEL_TOKEN=It is recommended that your device or server that you will be installing MyFin on has a static IP address.
If you are going to be the only user and will be installing and using it on the same device. Then this is not needed however if multiple users are going to connect to it from different devices on your network, this is needed.
We recommend assigning an address outside your router’s automatic DHCP range, or creating a DHCP reservation on your router.
If you are going to run this on a VPS, you will already be set up and given a static IP address.
Please consult you Operating Systems manuals on how to do this.
In this guide we have set our server / device to have the following IP address:
192.168.1.250
Since we have 100 devices on our network and the DHCP range is from 192.168.1.40 to 192.168.1.160
using 192.168.1.250 will be a good fit.
This give room to increase the DHCP range in the future as the network grows and will not cause any conflicts with other devices.
Install the latest version of Docker. If you already have Docker installed, please skip this step.
On Windows or MacOS, download and use Docker’s Desktop Application:
https://www.docker.com/get-started/
If you are using a linux based VPS or operating system. You can use Docker’s installation script:
curl -sSL "https://get.docker.com/" | bashor
wget -qO- https://get.docker.com | shOr see the guide of your Operating system directly on Docker’s website: